


Product Photography Tips and Tricks
Whether you’re an established photographer with years of experience in the field or you’re a complete beginner who’s only experience is snapping photos from their smartphone on family holidays, the idea of product photography can be a daunting task. From shooting for a product feed on Google or Amazon, to photos for your own website and even print material, our product photography tips below will help you get started in the right direction.
Delivering high quality photos of your products is more important than ever before as we live in a world that’s becoming consistently more technology focussed, with online sales reaching an all time high. Having an eye-catching product photo with optimised lighting and appearance can really be the difference between winning the competition and going unnoticed. A good quality photo will optimise your product feed, be more likely to entice the consumer and give your brand an all over professional image.
Read on to find our top product photography tips for your next shoot.
Lighting
Whilst this might be an obvious one, it can often be overlooked and can be the difference between a high quality photo fit for a billboard to looking like a photo from the average Joe’s camera roll.
Carefully positioned lighting allows you to make the product the prominent centerpiece of your photo. A good starting point is to have one light either side of your product shining onto the background, this allows the product to be separated from the backdrop. Next illuminate the product itself with a light coming from above and one going directly onto it.
You can play around with the positioning of your lights and brightness to get the best results for your product. But note, whilst this might be time consuming it is essential to get right with every product and angle you shoot, it’s not a one solution fits all unfortunately.
You can view our range of lighting options here.
Choosing Your Lens
Whether you’ve got a Nikon, Canon or Sony camera from the top of the range spec, your camera will only ever be as good as its lens. It’s important to choose a high quality lens that truly captures the essence of your product for the consumer. We recommend for product photography to use a standard lens and not a wide lens, as this could distort your product giving a false representation.
Surroundings
Take your surroundings into account before you start shooting. If you’re taking your product photographs on a dedicated backdrop or lighting tent, this isn’t an issue. But for those using a lifestyle surrounding such as a house or nature, this product photography tip is for you. Start off by positioning your product in your setting and then step back and see where your eye is automatically drawn, it’s good to get a second opinion here.
If there’s objects drawing your attention away, either remove them or reposition so your product becomes the focal point. Whilst in nature you might find a large oak tree you’d like to shoot against, this could quickly overpower your product itself, play around to get the right balance of product and surrounding.
Use Props
Using props can be beneficial to the end user to get an idea of how they’d use the product and truly visualise themselves using it. For example it’s good to show a pan cooking food on the stove or a sofa being used by bringing in a person. But ensure your props don’t overtake the product, so keep your product central on the image with the prop only taking up a small proportion. So in these instances the person would be laid on one corner of the sofa or the food in the pan would take up just a small proportion of the area, this ensures your product remains prominent.
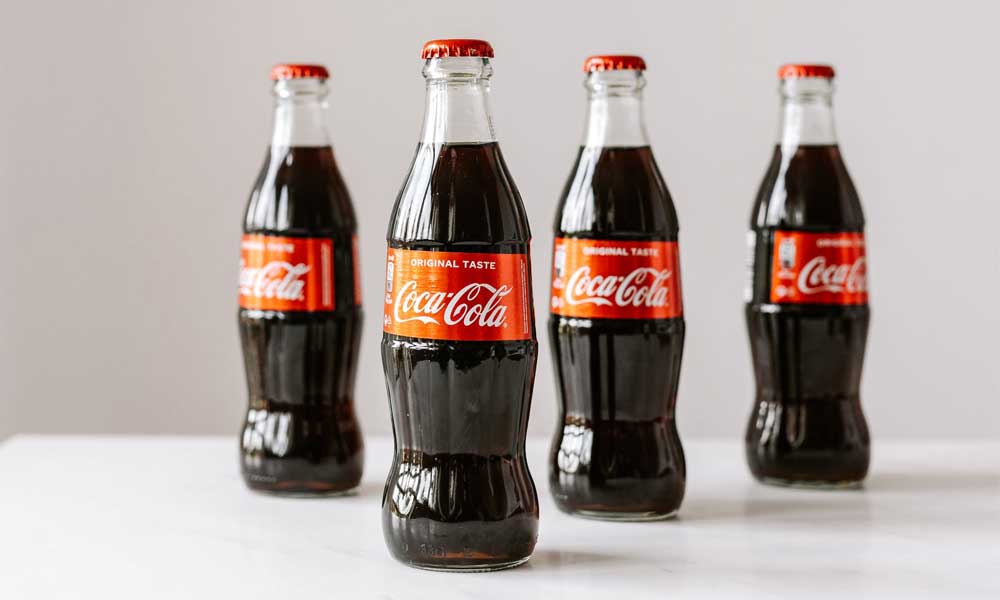
Take Multiple Photos
If you’ve got a large amount of products to shoot it can be tempting to take a few photos and move on. However, if these products are to be sold online the consumer needs to be able to see every detail of them in these images, if the text description talks about detailing on a zip, they’re going to want to be able to see that. Take your time to get high-quality images of every detail, it’s going to save time going back for a reshoot in the long run.
Tripod
Using a tripod allows you to produce a balanced, well proportioned and steady photo. Another benefit of using a tripod is that you can shoot a consistent array of photos, particularly important if you’re shooting a full range of products as it keeps consistency with very little effort from yourself.
We offer a wide selection of tripods, from fixed standing, three legged tripods to monopods with just a single leg. Discover our selection of tripods here at Harrison Cameras.
Stay on Brand
One of the most important product photography tips is to choose a style and stick to it. If you’re shooting an array of products for your ecommerce site it’s important these fit in with the existing content you have. By carrying forward a photography style it helps to build your brand identity and makes your website appear clean and professional. What’s more, a consistent style overtime will allow your products to be identified in a line up of images as belonging to your brand.
Stay on Spec
As outlined above, it’s important to stay on brand, but if you’re shooting products for product feed for say Google Shopping or Amazon you may have other specifications you must follow to meet their criteria. For example, Amazon photo requirements state that main images must have a plain white background and the product must fill at least 85% of the image, among other things.
Before starting to take photos it’s best to check any specification requirements and shoot to these standards, editing at the end to meet the requirements can be a much lengthier process.
Pay Attention to Reflections
Depending on the product you’re shooting this might not be an issue but if your product happens to be something like a mirror, sunglasses or even a shiny mug, a reflection can occur.
First up make sure you’re not in the reflection. Catching yourself or your equipment in the product reflection makes it look unprofessional and slightly cheap. You can remove this by simply readjusting your angle. Then decide how you want to handle the reflection, it could be possible to completely remove it by readjusting your lighting and your position or this may need to be done at the edit stage. If you’re keeping the reflection, for example in a mirror image, use a room prop so it looks natural and attractive.
Be Creative
Finally, be creative. In a world where nearly everyone is selling their products online, it’s important to dare to be different, it might just be the eye catching difference you require.
Take clothes brand Zara for example, where everyone’s taking the standard shoots, Zara’s models stretch the normal with flambioent and anything but natural poses. You can do the same, find a new normal, whether it be shooting in the outdoors, unusual backgrounds or stripping it back to basics with a solid background, just be sure to keep your product photography on brand, as discussed in point 7.
If you’re looking to get a new camera for product photography or have recently just started your own website and want to take the product pictures yourself, then we recommend checking out our extensive range of used and new cameras. For more advice on which camera to buy, visit us in store or speak to a member of our team on 0114 2859854.